Monday, November 5, 2012

Teachers make magic happen - SMART Board

Enhancing lessons and engaging your audience with the SMARTBoard is easier than you think by using interactive tools.  This post will provide an overview of the information you can use to create and customize tools included in the SMART Notebook software.  Let the magic begin...

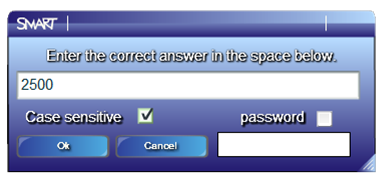
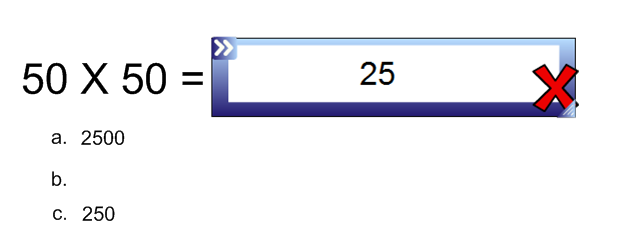
 The Checker Tool:


  1.  From a blank page in SMART Notebook software, type a question and list of answers, ensuring the answers are separate from one another.  Grouping and lock the question.
  2.  From the Gallery tab, enter Checker tool and click on Search icon. 
  3. Click and drag the checker tool to the SMART Notebook page.

  4. Resize by clicking and dragging the resize handle, bottom-right corner of tool. 
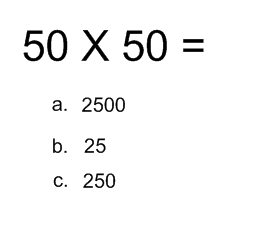


    5.   Enter the correct answer to the question by click on the edit arrows, top-left corner of tool.   Click and drag answer into the Checker too.  This tool provides students with instant feedback great interactive tool.  


 Erase to Reveal:


  1. From a blank page in SMART Notebook software, enter the information you want to hide.


  2. From the toolbar, click on the Pens tool, click on the Properties tab.  Select the color that matches the background and select the widest line thickness.
  3. From the Properties tab, click on Save Tool Properties
  4. From the toolbar, select the Pen tool you created and draw over the object that you want to hide (add digital ink layer).   The object will disappear as it will now be the same color as the background. 
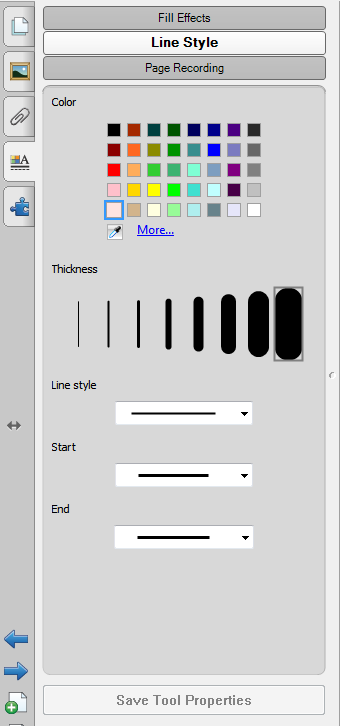


This effect allows students a hands on experience when using the SMART Board by using the eraser and erase the hidden object(s).  Receiving instant feedback as they erase to reveal answers and check their work.


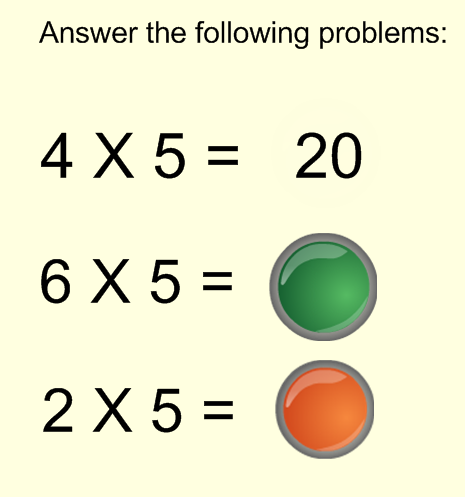
Click to Reveal:

  1. From a blank page in SMART Notebook software, type/place the information you want to hide and reveal.
  2. From the Gallery tab, enter button and click on Search icon.
  3. From the Pictures folder, click and drag a button over the object you want to hide and reveal.

  4. With the image (button) selected, select Properties.
  5. From the Properties tab, select Object Animation.  From the Type drop-down menu, select Fade Out.  Lock the button in place.
Adding this element to your lesson; students verify their work, receiving instant feedback by pressing the button on the page.  The button will fade out revealing the answer or hidden object.


 Random Generator Tool:

  1. From a blank page in SMART Notebook software, create a question template. Group all objects and lock in place.
  2. From the Gallery tab, enter Generator and click on Search icon.
  3. From the Interactive and Multimedia folder click and drag the Random number generator tool to your page.  
  4. Resize tool by clicking and dragging the resize handle on the bottom-right corner of the tool.  Edit or customize by clicking on the edit arrows also located on the bottom-right corner of the Random Generator Tool.
  5. Click on the edit arrows to save. 
  6. Press within the white space of the tool, press the arrow to place the number on your Notebook page.  Press and drag the number to a location on the question.
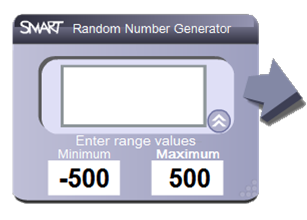
Teachers can quickly generate different values while gaining students interest by interacting with the SMART Board.  Also- There are other generator tools;  Random letter, vowel, and word --check them out!


Tuesday, July 10, 2012

SmartBoard Level 2 Topics

Recently I spent one full week training with a group of teachers from NYC on the SMART Board.   The certification course/training was offered by Teq allowed me to increase my knowledge on SMART Boards and becoming certified was an added bonus. Teq offers educators a variety of professional development services designed to help schools make the most of their technology purchase.   I have taken several courses from them at the Cicero, NY location and I have found all of the training sessions very informative, useful, and at a reasonable cost.

Sharing what I learned with professors and students at Fisher by offering the next level of training on SMARTBoards.  Below is a list of  Level 2 topics for SMART Boards.

Adding Sounds:

sound iconTo add sound to an object, select the object and from the drop-down menu select Sound. The sound will play when the object is touched/clicked on. The sound file format must be .mp3.  Alternatively,  drag and drop the MP3 file on top of the object - the faster the better, automatically adding the sound to the object. 


Sound Resources: 

*always remember to site your source, even if it is free*

American Rhetoric - online speech bank
FindSounds
- a free site where you can search the web for sound effects 
The Looney Tunes SoundSource
  - a large selection of Looney Tunes sound files

Convert Sound files to .mp3:

iTunes, Audacity, and Format Factory require installation of software on your computer.  Zamzar website emails the sound file to you.  My choice for converting files is convertfiles.com- a website were you can browse or from a link convert sound files and save to your computer. 

  1. Browse to choose a local file or download from a link. Select the Output format (.mp3) and click on Convert.  
  2. Right-click on the link and select "Save Link As or Save Target As". 


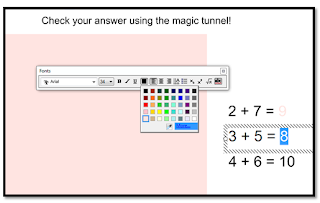
Container Sort/ Magic Tunnel effects:


All students no matter their age love magic- so as a teacher let's give them what they like!

Create a Magic Tunnel for students to drag items through to reveal an answer.  Using an object, color and ordering and understanding how Notebook manages objects makes this a simple task.  Remember to lock your tunnel so the students can move it when using the SMART Board.


  1.  From SMART Notebook, draw a rectangle over 3/4 of a page, select a fill and line color.  Lock in place
  2. Enter your text (math problem, words, etc...) select the answer and change the color to match the rectangle.  Drag objects onto colored rectangle.
  3. Add an object to be the tunnel.  I used MS Word shapes (copy and paste) into SMART Notebook.  Add text, group the text and object, then lock in place.  When the students drag the problem through the tunnel the answer is revealed. 


A container sort adds another type of interactive feature to engage learners.


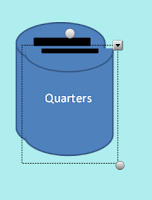
  1. Create container objects.  I used MS Word and drew a slot on the top of cylinder.   You can use a garbage can, basket, cup, etc... for the container.
  2. Within SMART Notebook, place 3 containers on a page.  Choose an object to sort, i.e., coins and place on page too.  At first when you drag the coin into the container it goes in front.  We want it to appear that the coin is really going into the container.  Remember each object placed on the page goes in front (layered) of the previous object. Layers and order of items placed on page will help to make the process easy.
  3. Using the Screen Capture tool, we will take a picture of the container from the slot down.  This object will be placed directly over the first container. Continue the same process for all containers.


  4. Select the quarter and the two container objects and from the drop-down menu select Order and click on Bring to Front.  Select the nickel and the two container objects below it and from the drop-down menu select Order and click on Send to Back.   
The result is that quarters will go into the quarters container but will not go into the other two containers, same for dimes and nickels.   Locking both pieces of each container will ensure students won't be able to move them.  


When a student drags the coin to the wrong container it won't go in.  Teq has a wonderful video on how to create a container sort page in SMART Notebook- their video along with my directions should be all the tools you need to create this interactive feature. 


Adding Groups

Creating Groups allows you to place pages into specific groups that you can access directly.  This is a great way to work with a file that has many pages.

  • From the Page Sorter view, from the drop-down menu select Edit Page Groups
  • Add new groups, move, re-name or delete groups
  • From the Groups View, click on the X in the upper right corner to return to your working screen. 

Adding Themes

Themes allow you to add a page design to multiple pages or an entire Notebook file.  You can select a Theme from the Gallery or create your own.

  • From the Format menu, select Themes and choose Create Theme or Create Theme from Page
  • Enter a name for the new theme.
  • Set text style; font, size, etc...
  • Set the background color(s) for the theme from the Properties Tab.
  • Add objects to page, drag and drop from Gallery.
  • Click on Save to save the new theme to the Gallery.  It will appear in the My Content folder under Backgrounds and Themes
  • Drag and drop onto page and from dialog box select Insert theme on all pages, Insert theme on all pages of current group, or Insert theme on current page only.


Thursday, May 17, 2012

Windows 7 tips

Tips for end users...

Aero Peek Your Desktop:

If you are like me you have a lot of windows open and it can take several clicks to see the desktop. Windows 7 introduced a tool that very few know about, "Aero Peek".  If you want to Aero Peek your desktop just click the rectangle in the lower right hand corner of the taskbar for quick access to your desktop.  How easy is that?
Keyboard shortcut Windows key + Space can accomplish the same function. 


Multi-Monitor Window Management:

Do you have multiple monitors? Move your new/active window between the two monitors with keyboard shortcuts.

Shuffle Through Program Windows:

Switch through window with ease- If you have multiple document files in MS Word.  Press & hold the CTRL key while clicking the icon from the taskbar.  The window will change to the next in the order that you opened them. 

Project Your Display Easily:


Plug in a projector or project your display using the Windows 7 drive utility, displayswitch.exe.  Press the Windows key + P to display the navigate pop-up window. Use the arrow keys to switch through multiple display settings. 

=

Clutter-Free:

I am all about organization, a fast way to de-clutter in Windows 7 press Windows key + Home to minimize all inactive windows. To restore, press Windows + Home again. 


Windows + Up/Down:

Maximize or minimize an active window by pressing Windows + Up Arrow and Windows + Down Arrow


Magnifier:  My old eyes really appreciate this tip!

Press the Windows button and the plus or minus key to activate the magnifier letting you zoom in or out of the entire desktop.  
What is your favorite tip? Comments welcome-

Friday, March 30, 2012

Newest iPad (iPad3), my review

Normally I am all about teaching and instructing but recently (yesterday) I received the newest iPad.   As with all the gadgets I am lucky enough to get my hands on, all other work went to the wayside.  I currently have all three generation of iPads.  I have enjoyed the new features and enhancements with each model/version/release of the iPad.  The top 3 things that thrill me with the latest iPad are...
  1. The Retina Display - until you see it you can't believe the difference from the iPad2 to latest iPad.  Immediately the resolution on the 9.7 screen is sharper, more vibrant with more pixels (1536 x 2048) packed into the screen.   The clear crystal clean image as well as the color reproduction brings a reality to images.  Simple terms- great picture!
  2. Quad-core graphic processor - faster graphics, faster downloads-- performance, speed, web browsing are great improvements to an already awesome device. 
  3. 5MP iSight camera -the camera improvements allow you to record HD video in full 1080p.  It is also optimized for different lighting.  It gives you 8 mega pixels (better than 50% more pixels than the camera on the iPhone 4).  You see a dramatic difference in the resolution and details of your images.  The uses for the camera improvements extend farther than personal use.  Consider sports- coaching and training- have you seen that new app Coaches eye?  Education- field trips, special events, moments that can be shared with family.  Use photos and video to engage student learning and the writing process.  Health care- an iPad in the hands of every doctor/technician, and physical therapist.  Corporate American can also make use of this product, marketing your company brand.  I believe this allows all users the ability to capture a moment and share in some might say is "real time" enhancing their customers experience. I am all about good customer service.
Additionally, the iLife apps add another element to the tablet experience.  Mobile Hot Spot is also supported but only through Verizon.  If you purchase the new iPad Wi-Fi + 4G you can share your network with up to 5 Wi-Fi enabled devices and if you can believe this ---at no additional cost- per Verizon's website.   Voice dictation is another bonus I have yet to explore, but from what I have read it is spot on almost 95% of the time and it supports US English, British, Australian, French, German, and Japanese.

The newest iPad is a little heavier and maybe it gets a little warmer (so they say).  My opinion is that the improvements are significant and a good reason to support purchasing the latest and greatest iPad!  This company is amazing; the strides they continue to make in technology could have an impact on health care and assist in health care reform. Apple seems to be 1-2 steps ahead of the rest, such vision- Go Apple! 

Let me know your thoughts, what do you like or don't like about the newest iPad? What do you do with your iPad? We learn by sharing.  Keep smiling!

App Resources: 
Free Math Apps By Grade Level via Tutor House

Thursday, January 26, 2012

iPad2 tricks and tips


iCloud stores your music, photos, documents, and more.   Pushes them to all your devices and automatically keeping everything up to date. 

iCloud features:  http://www.apple.com/icloud/features/

  •  iTunes in the Cloud- music purchased in iTunes appears automatically on all devices.
  • Photo Stream- take a photo on one device, automatically appears on all devices.
  • Documents in the Cloud- iCloud enabled apps on more than on device, iCloud will automatically keep your documents up to date across all devices. 
  • Apps, Books, and Backup- make sure all devices have the same apps and books.  Also backs up your information.
  • Calendar, Mail, and Contacts- stores calendar, mail, and contacts and automatically pushes them to all your devices. 
  • Find My iPhone- sign into icloud.com or use the app from another device to find your missing device.

User guide- view on iPad

  • Bookmark icon
    From Safari- tap the Bookmarks icon , and tap the iPad User Guide from the list.
  • Arrow icon
  •  Add icon for user guide to Home Screen- tap the arrow pointing to the right , and then tap Add to Home Screen.  
Or...
  • From iBooks- open iBooks and tap Store.  Search for iPad User Guide, select IO S 5 (latest) and tap Get Book.  This will open the iPad User Guide within iBooks. 

Organizing w/folders

Folders can be used to organize icons on the Home screen.  You can put up to 20 icons in a folder. 
  • Create a folder- press and hold an icon until the icons begin to jiggle, drag the icon onto another icon.  You can tap the name field to re-name the folder. 
  • When finished organizing your Home screen, click the Home button to save the changes. 
Access all running apps
Double-click the Home button will display all the apps that are running on your iPad in the bar at the boom of the  screen.  To switch to a running app, tap on it from the bar.  

Lock screen
Lock the screen orientation or use music controls- double-click the Home button, flick along the bottom of the screen.  The screen orientation lock, brightness slider, and music controls will appear. 

iPad2 gestures
  • Use four or five fingers, swipe up to reveal the multitasking bar, pinch to return to the Home screen.
  • Swipe left or right to switch between apps.
Notifications


The Notification Center displays all your alerts in one place.  Swipe down from the top of the screen to show the Notification Center.

  • Respond to an alert- tap the alert from the Notification Center or swipe the alert from left to right to respond to an alert on the lock screen.
  • Remove an alert- Tap the and tap Clear.
  • Set up options for notifications- Settings> Notifications.

Typing

  • Quickly type a period– double tap the Space bar.
  • Shift key
  • Turn caps lock on – Double-tap the Shift key.


  • Find a definition or alternative words – tap a word to select it, tap Dictionary or Suggest.  


    Dictionary or Suggest


  •  Shake iPad, or tap undo on the keyboard.

Shake iPad to undo
  • Cut, Copy, Paste- touch a word and hold it until the magnifying glass comes out.  Left go and the will with be highlighted including two pull bars on both ends.  Tap the "Copy" bubble or drag the handles to highlight more words.  Tap the location you want to past onto, touch and hold and the "Paste" icon comes out.  If using the keyboard bring up the "Select" and "Select All" command.  
Where is the Undo or Redo keys on the iPad keyboard?

  1. Press ".?123" key, a another set of virtual keyboard buttons including the "undo " button.
  2. Press "#+=" key, a another set of virtual keyboard buttons including the "redo" button.
Keyboard Layouts

  • Split keyboard- touch and hold the Keyboard button , slide finger to Split and release.   
  • Move keyboard-touch and hold the Keyboard button , slide finger to Undock to move the keyboard to the middle of the screen and release.   Return to full keyboard-touch and hold the Keyboard button , slide finger to Dock and Merge and release.
Split iPad keyboard image

How can I take a screen shot from my iPad?  Yes

It takes two button presses!  First, hold the power button on the upper right hand side of the iPad and then pre the "Home" button. (main button on the middle lower part of the iPad screen)

My iPad keeps freezing, what do I do?
In most cases, a "hard reset" fixes most issues.  It takes two button presses to do a hard reset.

Press and hold the Power/Sleep/Wake button on the upper right of your iPad along with the Home button on the middle lower part of the iPad screen.  After 10 seconds, you should see the Apple logo.  That is the sign that you've successfully completed a hard reset. 


Protecting you data is always a good idea!

A passcode is a security feature to help protect the information on the iPad from being accessed by others.
  • Set a passcode- Settings> General> Passcode Lock> Turn Passcode On, enter a 4-digit passcode and verify.   More information on Auto-Lock page 123 of iPad User Guide.

Can I change the name of my iPad?  Yes
  • From the Settings menu>General>About> Name

Additional App Resources:

Check out my review of the newest iPad (3) 
Free Math Apps By Grade Level, via Tutor House


Monday, January 23, 2012

Echo 360

Echo 360 at St. John Fisher college has recently been upgraded and additional appliances installed in the Wegmans School of Pharmacy bldg, School of Nursing and Victor E. Salerno School of Business. 

Lecture Capture will enable you to record the audio of your lecture, the content on the computer and video of the instructor at the podium.  Captures can be scheduled to begin and end automatically or an ad hoc recording can be made while in the room.

Scheduled Captures:

A course(s) can be setup to be automatically captured on a re-occurring basis. Scheduled captures are handled differently than Ad Hoc captures. 
  • A scheduled capture doesn’t require the instructor to login to the Echo 360 appliance.
  • Five minutes prior to the beginning of your class, instructors can log into Echo appliance (using desktop icon) to cancel a capture or begin immediately.
The captures can be published as Rich Media Flash files, as well as an MP3 podcast or M4V Video podcast, the default configuration captures video, display and audio. 

Can you change what is published? Yes

  1. Click on the title of the Echo and click on the blue Edit button at the bottom  of the screen. 
  2. Within the Product Group Information section, from the drop down menu select the product and click on Save.
  3. Within the properties of the session window, scroll down to the bottom of the page and click on Reprocess Media.  This will update the captured session.
  4. The updated echo will replace the original link.


Example:  The capture was created with the default configuration (video, display, and audio) and you would like to remove the video.  From the Product Group, select #3 Audio +Display - All Formats - High Quality.  Click on Save and Reprocess Media 

How do I make my echo available? 
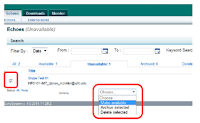
By default all lecture captures are made unavailable. Within the user interface from the Echoes tab echoes can be made available for end users to view.  

  1. Select capture-check box to the left of the title. 
  2. Select Actions-from drop down arrow, select Make available.  


What is the Echo Center (course portal)?

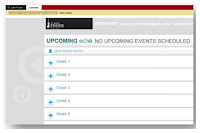
The echo center is a web page that displays all processed lecture captures for each individual course.


  1. Click on the title of the capture, from the Echo Details page, select the URL for the EchoCenter Page and Copy the URL.
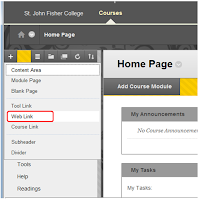
  2. From Blackboard, create an external link and paste the URL to the EchoCenter page.  
  3. From the Add External Link dialog box enter Name, paste URL, make Available to Users, and click on Submit
  4. All captures will be displayed for the course.  


How do I add External Media?
Although you probably use the EchoSystem primarily to record class lectures, you might also want to use it to preserve and distribute other materials. These may or may not be linked to a particular class or lecture.  You can upload any of these materials to the EchoSystem then edit and manage them as you would an Echo.

EchoSystem calls these materials "external media" because they are not captured by the EchoSystem. Instead, you upload them yourself. The process of uploading an external file is called "external media ingest" or EMI.
  • Upload multiple files to a specific class meeting, though you must upload them one at a time
  • Upload files that are not associated with any class or any meeting
  • Upload as many files as you like, though your System Administrator may limit the total amount of external media you can upload to a section
  • Edit files with the standard Echo editing tools
Supported file formats: AVI, FLV, M4V, MP4, and MOV

Add External Media:

     1.  Log into the User Interface and within the Echoes tab click on the Media Import link.


     2.  Specify the required settings:
  • Term- This setting helps to associate the external media file with a specific class meeting or event.
  • Course-This setting helps to associate the external media file with a specific class meeting or event.
  • Section- This setting helps to associate the external media file with a specific class meeting or event.
  • Start Date-You can use this setting to associate the external media file with a specific class meeting by specifying the day of the lecture.
  • Start Time- You can use this setting to associate the external media file with a specific class meeting by specifying the time of the lecture.
  • Title- A descriptive title helps viewers to understand what to expect in the media file.
  • Description- A description helps viewers to put the information in the media file in context.
  • Media Type- Specify the format of the recorded file.


     3.  Click the Upload File field, browse to the file location on your compute and click on Open.

The Echo System will verify that the file is in an appropriate format and may notify you of any      completed text fields.

    4.  Click on Next, select and confirm an appropriate product group.  The lower the quality, smaller the file download size will ensure faster download time for end users.

    5.  Click on Start Processing.  You will receive notification when the Echo System has reprocessed your file and email you a link to the podcast when it has been completed.

    6.  By default the echo will be listed as Unavailable.  Students will have to provide their SJFC network credentials to access the echo.