Monday, November 7, 2011

SmartBoard Training - Getting Smarter followup

After another great SMARTBoard training session, because it is a use it or lose it tool many asked for written documentation on several topics I covered including links to additional resources etc...  Below are topics we covered. 

Infinite Cloner
1. With an object selected, from the drop down menu select Infinite Cloner.  This allows users to drag multiple copies of the same image.

Image of a quarter after selecting Infinite Cloner


Table Shade
1.  With the table selected, from the drop down menu select Table Shade.  Teachers or students can press to reveal contents of the table cell by cell.  

Using a table Shade to reveal cell contents

Group and Lock objects
Individual objects can be grouped together to create one object and locked on a page.
1.  Select all objects, from the drop down menu select Grouping and click on Group.


2.  Now the five individual objects are one object.  If you want the object not to move around the Notebook page, select Locking and click on LockIn Place.
 3.  To unlock an object, with the object selected,click on the lock and select Unlock.


Screen Capture
Using the Capture tool will take a copy this is displayed on your screen and use it as an object within SMART Notebook software file.
1.  Click on the Capture button and the floating Screen Capture toolbar appears. 


2.  Each button performs a different function.  The captured image will appear on a new page within the SMART Notebook file as an object.


Page Recording

1.  To record a action(s), with the object selected, from the Properties tab select Page Recording.  Click on Start Recording


2.  All of your actions are now being recorded.  When you are done click on Stop Recording.

3.  Playback controls are placed on the page; play, pause, or stop.


4.  To remove the recording click on the black X.


Object Animation
1.  With the object selected, from the Properties tab, select Object Animation. Select a Type, Speed, how it Occurs, and if it needs to Repeat.
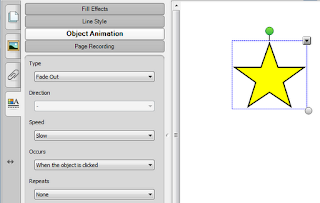



The animation can reveal something hidden behind it  by using the Order command from the drop down menu.


Random word chooser 
From the Gallery tab, within the Lesson Activity Tool Kit, search by random.  This will bring up a list 
of Interactive and Multimedia items.


You can customize by adding student names, select No repeat, and change the number of names.  When ready to use click on Select


Additional Resources:

6 tips- Getting Smarter using the SMARTBoard (includes the Magic Pen Tool) 4/1/11
 http://techtips-rs.blogspot.com/2011/04/6-tips-getting-smarter-using-smart.html

SMARTBoard - Changing the Pen Color 2/14/11
http://techtips-rs.blogspot.com/2011/02/smartboard-changing-pen-color.html

Set Picture Transparency- Get Smarter 3/4/11
http://techtips-rs.blogspot.com/2011/03/get-smarter-set-picture-transparency.html
Add a YouTube video and a link on How to customize Balloon Pop found on the SJFC Training Website: http://www.sjfc.edu/campus-services/oit/training/itec.dot

SMART Notebook software download- http://smarttech.com/us/Support/Browse+Support/Download+Software

Download Jing Free; create  videos and screen captures- http://www.techsmith.com/jing.html


Friday, September 2, 2011

OWA 2010- What makes it so great?

I use email to correspond with end users at SJFC as well as family, old friends, and including newsletters that I subscribe to as I am sure all of you do as well.  I have always used the Outlook client version, even on my laptop-never relying on the web version.  With Exchange 2010 implementation, OWA (Outlook Web App) has changed my mind, it is almost a mirror image of the Outlook desktop experience.

At Fisher we have migrated to Exchange 2010, our students are using OWA as well as Faculty and Staff.  Sharing is what I do... so take a look at just a few new features to help make your email experience efficient and easier to navigate around the world of OWA!


Conversation View
Within OWA and Outlook 2010 this is one of my favorite new features.  By default the conversation view is turned on grouping all email messages based on the same subject together.
  • Change/remove the Conversation View as well as the Reading Pane
  • Look at additional Conversation options
1. From the View menu, click on Use Conversations to remove.  Adjusting or turning off the Reading Pane can also be changed from the View menu. 


Additional info: OWA Help Topic:http://help.outlook.com/en-us/140/ee373833.aspx


2.  With a message open, at the top, is a menu including the ability to use Flags, Categorize, move to a folder along with the standard Reply, Reply All, and Forward commands.


3.  Opening a Shared Calendar, side-by-side is a along waited addition to the web mail experience for many Outlook users. 


4.  Open another user's Inbox, you can now select another mailbox from the Global Address List and it appears in the Navigation Bar below your mailbox.
  • Right-click on your name within the Navigation Bar on the left and select Open Other User's Inbox


5.  Mac users rejoice--OWA supports the same experience on a Mac with Firefox and Safari. Previously IE was the only browser used to view full version of webmail. 

6.  Edit and mange Public Distribution Lists, this is a great addition to webmail.  I have had several requests on how to accomplish this task so I created a 1 page pdf and posted to OIT website.  Check it out! 

There are more new features, leave a comment and let me know your favorite! The more we share the more we learn.  Thanks for reading.


Monday, July 18, 2011

Internet Explorer 8- change the default search provider

During a training session this morning, I was asked; " How to change the default search engine within Internet Explorer?"  At first I thought this must be easy, Tools>Internet Options and so on, but it took a little searching to find out where Internet Explorer hides/buries the ability to change  the default search provider (Bing).  It's easy if you know where to look and what to click on.  I use Google for searching, find your favorite and set it as the default with the steps below.  Kudos to those attending my training session today, for a great question and for working together to find out the solution. It is true when people work together anything is possible.

1.  Launch Internet Explorer, click on Tools, and select Internet Options.


2.  Within the Internet Options dialog box, from the General tab,  and within the Search section click on Settings.


3.  Within the Manage Add-ons dialog box with Search Providers selected, click on Find more search providers... at the bottom of the dialog box.


4.  Internet Explorer will display a selection of Search Providers, if the search provider you are looking for doesn't appear use the search feature to locate; i.e., Google.


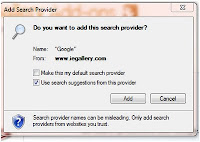
5.  Click on the search provider link, from the Internet Explorer Gallery Add-ons web page, click on Click to Install and from the Add Search Provider dialog box click on Add.


6. From Internet Explorer, click on Tools, and select Internet Options

7.  Within the Internet Options dialog box, from the General tab,  and within the Search section click on Settings.

8.   Within the Manage Add-ons dialog box with Search Providers selected you will see the new Search Provider (Google) listed, select it, and click on Set as default.


9.  Click on Close and OK.

Monday, May 23, 2011

The Power of SmartArt Graphics

I don't consider myself an avid PowerPoint user, I find people don't prepare slides correctly, to much text not enough graphics or images.  But PowerPoint has tools that can help add that pizazz, add an element of style that will energize your audience.  The feature was first introduced in PowerPoint 2007, the tradition continues with a few more additions in PowerPoint 2010.  SmartArt Graphics can help you convey your information/content with style and flair and it is easier than you think.

A. Using existing text to Create a SmartArt graphic:

1.  With the text box selected, from the Home tab, within the Paragraph group, click on the Convert to SmartArt Graphic and mouse over options to preview. Click on an option to add to your slide.


B. Using the Text Pane to reorder/edit text and images:

1.  With the SmartArt graphic selected, within the text pane select the text to be moved.


2.  From the Design tab, within the Create Graphics group, use the Move Up and Move Down commands to reorder text. 


C. Add additional shapes or bullets:

1.  From the Design tab, within the Create Graphics group, use Add Shape command to add another shape to the SmartArt graphic.

2.  From the Design tab, within the Create Graphics group, use the Add Bullet command to add additional bullets to the SmartArt graphic. 


Note: The Design and Format tabs are contextual tabs, only visible when a SmartArt graphic is selected.


D. Change Layout and apply SmartArt Style to SmartArt graphic:

1.  With the SmartArt graphic selected, from the Design tab, within the Layout group, select More Layouts from the drop down menu.  Select from the list of over 130 SmartArt diagrams and the addition of the Picture category. 


2.  With the SmartArt graphic selected, from the Design tab, within the SmartArt Styles group, choose a style to apply from the drop down menu. In addition, the Change Colors command will provide extra customization.


E. Change a shape, shape styles, along with additional formatting options:

1.  With the SmartArt graphic selected, from the Format tab, within the Shapes group,click on the Change Shape command and select a shape from the drop down menu. 

Additionally from the Shape Styles group; change the shape style, fill, outline, and apply an effect. 


Microsoft has provided a wide selection of diagrams they have also given you the ability to Convert Shapes allowing you even more choices in Excel and PowerPoint 2010.   From the Design tab, within the Reset group, click on the Convert command. 

Now you have a group of shapes that you can customize and move using the drawing tools.  Apply custom animations to the graphics making the possibilities almost endless. 


The best way to learn is to play, get in there and start using SmartArt graphics, hope you find the changes and additions easy to understand.  Start putting these amazing graphics to use in PowerPoint or other Office applications and let me know if you have any questions.

Tuesday, May 3, 2011

Formatting problem - How can I format zip code merge field to add hyphen if zip + 4?

Another great question inspired a deeper look into formatting Word Fields when working in a mail merge document.  Google is my friend and a found a site or two for assistance, but pictures speak louder than words, so here is my attempt to clarify how to accomplish the task.

You can format the contents of a field  inserted into a document, using a "switch" Alt + F9 will allow you to edit a manually inserted merged field and Ctrl + F9 will insert Field Boundaries { } needed to convert/change the merge field.

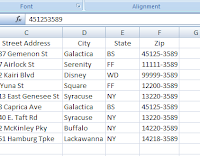
Senerio:  Your data source, in Excel the zip codes are either 5 or 9 digits.  Formatting the cells to add the hyphen (Format cells-->Special-->Zip+4) appears to correct the issue but a closer look at the formula bar reveals numbers only with no hyphen.  For a mail merge document using this data source the zip code will not have a hyphen in the mailing address field. 


Applying a number format that will convert all ZIP codes to ZIP + four format.  i.e., 451253589 will be changed to 45125-3589. Using a conditional field will apply appropriate formats even if the field has five or nine digits.  So lets give this a try...

1. Manually adding an address fields to letter/labels will show what a merged field looks like, previewing displays the zip code without formatting.


2.  Press Alt + F9- allowing for conditional formatting, click within and at the beginning of the MERGEFIELD Zip field and press Ctrl + F9** field boundaries have to be inserted not typed from keyboard, using Ctrl + F9 is the correct way to insert { }(field boundaries). 


 3.  Enter:


4.  Press Alt + F9 and preview letters/labels resulting in the formatting of a hyphen for the zip code field.

Additionally, if you wish the + 4 not to appear then use the following switch when formatting the field:


Feedback appreciated, let me know how it worked -RS

Other Web Resources:

Formatting Word Fields: http://www.gmayor.com/formatting_word_fields.htm

MS Office Forums: http://www.msofficeforums.com/mail-merge/6804-adding-dash-middle-my-field.html

Thursday, April 21, 2011

Link or Embed – Create a Dynamic link connecting content and a Excel workbook

Linking versus Embedding Excel data into a word document, do you understand the differences?  They may seem similar but the truth is they generate different processes and accomplish unique functions.  The main differences are, where the data is stored and how you choose to update the data after placed into a Word document.

Linking a file/data creates a link between the original data source (Excel spreadsheet) and the file ( Word document).  When a change is made to the data source the destination file is updated.

Embedding a file places a copy of the original data source into the Word document or the destination file. A change to data source will not be reflected in the destination file.  In effect, embedding creates a static copy of the data.

Insert a Linked Object - Excel Data into a Word document

1.  From Excel, select the data and press Ctrl + C (copy)


2.  From Word, click in the location where the data is to be placed.  From the Home tab, click on Paste and select Paste Special from the drop down menu.  


3.  From the Paste Special dialog box, select Paste link. Within the As list, select Microsoft Office Excel Worksheet Object and click on OK.


Edit/ update date the data in Excel.  You can manually open the Excel document or you can save time and launch the Excel file directly from word.

4.  Right-click the data and select Linked Worksheet Object, from the sub menu, select Edit Link


Or the fastest method--from Word double click the data to open the Excel data source file!


Embed an Object - Excel data into a Word document
**Remember- when you embed an excel object, data in the Word document doesn't change if you update the Excel worksheet.
1.  From Excel, select the data and press Ctrl + C (copy)


2.  From Word, click in the location where the data is to be placed.  From the Home tab, click on Paste and select Paste Special from the drop down menu.  


3.  From the Paste Special dialog box, select Paste.  Within the As list, select Microsoft Office Excel Worksheet Object and click on OK.