Tuesday, October 21, 2014

What is a Smartpen?

At St. John Fisher College, Office of Academic Affairs supports students with disabilities by loaning Livescribe Smartpens. The smartpens enable users to capture, search, and share handwritten notes. The smartpens synchronize handwritten notes with recorded audio. Currently we have three models available for loan; Echo, Sky Wifi, and Livescribe 3 smartpens.

How do smartpens help students with learning disabilities?

  • Note- taking help, homework help and before a big exam
  • Tap your notes and the smartpen will play back the professors explanation word for word 
  • Organize your notes; play back controls allow you to slow down or speed up the audio recording, even bookmark key information
  • Capture everything you hear and write - be confident never miss a word
  • Capture words, scribbles and diagrams & syncs everything to what is said

Not all professors allow students to use tablets or mobile devices during class, students take notes via pen and paper, it is still the most popular method of note-taking. Shocking but true. Reading your notes and/or listening to your recordings within a web based application such as Evernote allows users flexibility and control when reviewing what was captured, making the Livescribe pen a useful tool for today's digital lifestyle.

The smartpens have an embedded infrared camera that detects pen strokes on special Livescribe paper. Below are my reflections on the 3 models and best use practices. More detailed information can be found at livescribe.com 


The newest smartpen is the Livescribe 3, this pen uses bluetooth technology; notes appear on your tablet or smartphone instantly when paired with the Livescribe+ mobile app.  Your notes are organized, tagged, searchable and can be converted to text.  Turns your words into action!

Livescribe 3 smartpen
  1. To transfer your handwritten notes to Livescribe+, connect your Livescribe 3 smartpen to an iOS device that is Bluetooth ready.
    • iPhone 4S or newer
    • iPad 3rd generation or newer
    • iPod touch 5th generation or newer 
Notes:  Need iOS device and Livescribe+ app (free), additionally if your iOS device is NOT bluetooth ready, you can still use the Livescribe+ app to open and review pencasts that are send/shared with you by other Livescribe+ users. 

Ease of use/setup:
  1. Download the free Livescribe+ app - via App store designed for both iPhone and iPad
  2. First time, pair device.  
    •  iOS device- ensure Bluetooth is on
    • Turn on your smartpen, by twisting the middle ring clockwise
    • Open Livescribe+ app - device automatically detects your smartpen
    • Tap/touch Pair when prompted, after it connects the LED on smartpen turns blue and  smartpen icon appears top right corner of Livescribe+ app.

Features of Livescribe+ app:
  1. The app can be installed on multiple devices- up to 4.
  2. Real-time transfer of notes to supported devices.
  3. Enable sign-in and send notes to an existing Evernote account, as well as OneNote.
  4. Send each page or snippet as an image file, or PDF.
  5. Notes can be sent directly to your OneNote Notebook and/or Evernote app. 
  6. Notes taken while audio is recording appear in green on your pages and you can play the recording while in Pencasts view.
  7. Rename, delete, and share pages of your Notebooks.
  8. Add content to handwritten notes, add photos, text, and audio as well as converting handwriting to text. Swipe from left to right- reveal the converted text.
My observations:  At first review of this product I was extremely excited not having to be dependent on Wifi and the ability to sync my notes to OneNote.  The students ( I worked with) who wanted to try the newest smartpen used their cell phone- none had an iPad.  I use this pen for meetings, conferences, and other business situations during my work day.  If you are asked to be a note taker - the smartpen can be a life saver!


The Sky WiFi smartpen records everything you write and hear using WiFi technology.  This smartpen can also connect to the internet through your computer and the Livescribe Helper application. This is an alternative for updating and synchronizing your recorded notes and audio with Evernote. Your words, your ideas, any time, anywhere!

Sky Wifi Smartpen
It takes 4 simple steps to get started:
  1. Create a Livescribe account- it is free  www.livescribe.com/setup
  2. Link and/or create an Evernote account - its free and need to authorize (link Evernote and Livescribe accounts)
    Both of the steps above need to be done before you can begin to use your Sky Wifi pen.
  3. Activate your smartpen- enter the characters displayed on the screen of the smartpen and connect to WiFi. 
  4. Download and Launch Livescribe Helpter - I use the helper app to update the firmware on the smartpen.  If you don't have access to WiFi this app is a convenient way to backup/synchronize your notes and audio.
Recording audio using the embedded microphone for smaller recording environments such as classroom or conference room.  For larger lecture hall, use the Livescribe 3-D Recording Headset, which contains a microphone in each earbud.  I recommended that students sit close to the front of the classroom to ensure that the audio is captured clearly. 


The Echo smartpen uses USB technology to transfer notes from smartpen along with Livescribe Desktop software.  Notes can be shared to Evernote and exported in PDF format.  Capture it, Replay it, and Send it!!

Echo Smartpen
Get started by:
  1. Download Livescribe Desktop software - available for Windows or Mac OS.
  2. Connect the Echo using the USB cable to your computer.  Connecting the smartpen will transfer your notes and audio to Livescribe Desktop automatically.   Don't disconnect until transfer is complete.  
  3. Register and rename smartpen.
My Observations:  I found this pen more time consuming when loaning out to students, depending on the age of their computer, installing the software can take time.  The Echo smartpen ties the student to their desktop/laptop to transfer/sync notes & audio files.  I have students who prefer this model, but struggle when their computer isn't working or when they purchase new a computer and transferring notebooks/files. 


What do all the smartpens have in common?

  1. Sync and transfer notes from smartpen
  2. Use the Livescribe Dot paper
  3. Search handwritten notes
  4. Replay audio from devices
  5. Direct sharing to Evernote
  6. Send/Share via email
  7. Export audio files
  8. A great tool for everyone- no student should go to college without one!  (my opinion)
Livescribe has a great Comparison Chart for you to reference/view all 3 smartpen features side by side.
 

Thursday, May 1, 2014

See How Easily You Can Adapt to MS Office 2013


4 Apps - Word 2013 Excel 2013 PowerPoint 2013 Outlook 2013 & Essential Features You Can't Live Without

Need to Know New Features in Word 2013:


The Design tab consolidates Themes, Colors, and Fonts so they are easy to find. Find a wide range of format designs to choose from and preview a document style before applying.    Commands found within the Home and/or Page Layout (2010) are now found within Design tab.    


The Alignment Guides makes lining up images and other objects easy.  When you move an image, chart, or SmartArt illustration around in a document, Alignment Guides automatically appear. The guides help line up the image with other elements on the page.

Read Mode

Office 2013 allows comfortable reading from Word, turns a document into an interactive digital magazine.  Read Mode automatically resizes a document to the full window and onscreen arrows to flip through the pages.  Additionally, from a touch screen monitor swipe the screen from either edge to flip through the pages.  Right-click on unfamiliar words to display a definition without existing read mode. Also, click on any image, chart, or table to enlarge it for easier reading.
From the View tab, within the Views group select Read Mode.        


Bookmarks
Reopen a document and a bookmark is placed in the last location you scrolled
and keep reading right where you left off!


Open and edit PDF’s
Word 2013 can open a PDF document as well as enabling you to edit without the need of a third-party application.  In addition, you can edit the data inside tables and move images around the document with ease with PDF Reflow.  Works best with documents containing mostly text.


Simple Markup Tracking
Track changes default view, Simple Markup makes it easier to read the document.  See comments and tracked changes by clicking on the red bar to the left of the text. 
  • Lock a document into commenting mode prevents other authors from turning off Track Changes.
  • Click on the reply button within the comment to respond, or from the ribbon click on New Comment.
  • Right-click on a comment and click on Mark Comment Done-closes comment/replies.


Working with Images

Switch layouts easily, click on the Layout Options button on the top right corner of the image and select one
of the choices. 

  • Live layout displays what a new layout will look like as you move, resize or rotate images.
  • Alignment guides help you align your images with text.
  • From the Insert tab, click on Online Pictures – search using Bing.


Online Video - Additionally, Insert video into your documents and users can view it in Word. 

Present document online
If you have a Microsoft Account…

With everyone connected to the service; Microsoft Word Web App- they’ll be able to follow along as you present. MS Office 2013 Presentation Service allows you to present Word documents online. 

Sign into your SkyDrive account, select File>Share>Present Online, and click on the Present Online button. 

Note:  Additional support for presenting online available at Microsoft


You don't be afraid, the New Features make it Easy - Excel 2013

The Excel Environment, current Excel 2010 users should feel very comfortable with Excel 2013. From the Excel Start Screen you’ll be able to create a new blank workbook, choose a template, or access your recently edited workbooks.  

Using FlashFill

Similar to the Fill handle, FlashFill can enter data automatically by detecting patterns and offer suggestions, saving you time and effort.  Enter the data to establish a pattern, when Excel recognizes the pattern, suggestions are offered, if correct press Enter.  
  • From the Data tab, within the Data Tools group, select FlashFill button 
Additionally, Click on the FlashFill button next to recently added data to modify or undo.  


Quick Analysis
The Quick Analysis galleries are dynamic what is displayed within them changes based on the type of data you’ve selected.  Quickly select from commonly used formatting features. The live preview allows you to see what is going too happened prior to committing to a change.
  •   Select data and click on button that appears bottom right of selected data.
  • The default, the Formatting Gallery is displayed listing a handful of choices, in addition there are other categories of tools- Charts, Totals, Tables, or Sparklines tabs.
  • Hover over each button to preview and click on the button to apply that feature to your worksheet.


Recommended Charts

This new feature displays a list of different chart types based on the selected data, as well as a live preview of the chart with your data in it.

  • From the Insert tab, within the Charts group, select Recommended Charts and click OK to apply.
In Addition, it is easy to create a new pivot table with Recommended PivotTables button. 
  • Within you data list, select a cell.  From the Insert tab, within the Tables Group, click on Recommended Pivot Tables button. 

7 Effortless Ways PowerPoint 2013 Can Work for You!


Ready for use on tablets and phones Microsoft PowerPoint 2013 has a brand-new look, allowing you to swipe and tap your way through presentations. 

Re
Presenter View - hassle free 

  1. From Slide Show View, on the control bar at the bottom left, click the more icon and select Show Presenter View.
  2. Move to previous or next slide
  3. View all slides –click on See all slides icon.
  4. Zoom into the details of a slide – click on Zoom into Slide.
  5. Point or write on slides- click on Pen and laser pointer tools.
  6. Hide/unhide current slide – click on Black or unblack slide show.
Wide Screen friendly
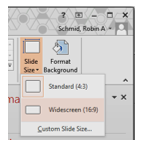
PowerPoint has goon widescreen, there is a 16:9 layout to take advantage of the widescreen possibilities within the new themes designs.  Previously in early versions of PowerPoint slides were squarer (4:3).

To change the slide size from standard to widescreen:
  1. From the Design tab, click on Slide Size
  2. Select Widescreen (16:9)


Line-up and space objects equally
Smart Guides automatically appear when your objects are close to even and they also tell you when objects are spaced evenly.


Motion Path
When you create a motion path, PowerPoint shows you where the object will end up.  You original object stays put and a “ghost” image moves along the path to the endpoint. 


Merge Shapes
Use two or more common shapes on a slide and combine them to create new shapes.
  1. Select all the shapes to merge
  2. From the Drawing Tools Format tab, from the Insert Shapes group, click on Merge Shapes and select the option you want. 


Eye Dropper for color matching
Exact a color from an object on your screen and apply it to any shape
  • With the shape(s) selected, from the Drawing Tools Format tab, within the Shape Style group, click on Shape Fill and select Eyedropper.


Improved Video and Audio
PowerPoint supports .mp4 and .mov with H.264 video and advanced Audio Coding (AAC)


Why Another New Look, It is Awesome I Promise - Outlook 2013


Navigation Bar
Mail, Calendar, People, Tasks, Notes, click on More…to see Folders and Shortcuts.
From the Navigation Bar, hover the mouse over Calendar, People, or Tasks for a Sneak Peek without leaving mail.

Use Message Preview


The first line of every email is automatically displayed and you can adjust to show more or less.

  • From the View tab, within the Arrangement group, click on Message Preview.
  • Select the number of lines to preview for each message.  Additionally, select Off to turn off the preview.  
Weather Bar
 
Within the Calendar view, the Weather Bar displays a daily forecast for your city in real time.  Additionally, you can add up to 5 locations.

  1. From the Calendar, click on the Weather Bar,
  2. from the drop-down menu select Add Location.
  3. Enter zip code or name of city and click the Search
  4. button.
  5. Select the desired city.
People (Contacts)
 
Contacts have been replaced by the People hub, center for all your contact information.  Connect People to a social network and import all of your connections’ data and updates into Outlook. 

Connect to a Social Network
  • From Outlook click on View.
  • Within the People Pane group and select Account Settings from the list.
  • Select LinkedIn or Facebook, enter you username and password for the social network and click on Connect.

Insert Online Pictures
 
Within the body of an email message add images from online sources; Office.com and Bing

  • Within the body of an email message, from the Insert tab, within the Illustrations group, select Online Pictures.
  • Enter search keywords, select an image and click on Insert.   
Don't Forget: MS Help
Click the Microsoft Outlook Help button on the top right or press F1.